How To Use Premiere Pro Templates

Your Video’s Secret Superpower
So, you’ve got Adobe Premiere Pro open, and you’re staring at a blank timeline that feels about as inspiring as a wet sock. We’ve all been there.
But what if I told you that you could skip the boring, fiddly, and utterly soul-crushing setup part completely? That’s where Premiere Pro templates come swooping in like a superhero in a cape made of keyframes.
What Even Is a Template?
Imagine buying a pre-built IKEA wardrobe, but instead of a confusing manual and a missing screw, it’s a fully finished closet ready for your clothes. That’s a template.
Must Read
It’s a pre-made project file packed with fancy titles, transitions, lower thirds, and even full-on animated intros. You just drop your video in, change the text, and BAM – you look like a Hollywood editor, not someone who just discovered the razor tool.
Think of it as the “paint-by-numbers” of video editing. You bring the paint (your footage), and the template hands you a masterpiece canvas.
Getting It Into Your Project
First, download a template from a site like Envato Elements or Motion Array. Unzip the file, and ignore any folder that looks like it’s full of alien symbols – you’re looking for a file that ends in .mogrt (that’s a Motion Graphics Template).
Now, here’s the magic trick. Open Premiere Pro, and look at the bottom left corner for the “Essential Graphics” panel. If you can’t see it, click “Window” at the top and tick the box – it’s like finding a secret door in your own house.

In that panel, look for a little folder icon that says “Install Motion Graphics Template.” Click it, find that .mogrt file you just downloaded, and double-click it. Poof. It appears in your library, ready to party.
Drag, Drop, and Don’t Panic
Now, simply grab that fresh template from the “Essential Graphics” panel and drag it right onto your timeline. Put it above your video clip, like a fancy hat on a very ordinary head.
When you drop it, your timeline will suddenly come alive with colorful bars and funky shapes. Do not scream. This is normal. That chaos is actually a well-choreographed dance, and you are the choreographer now.
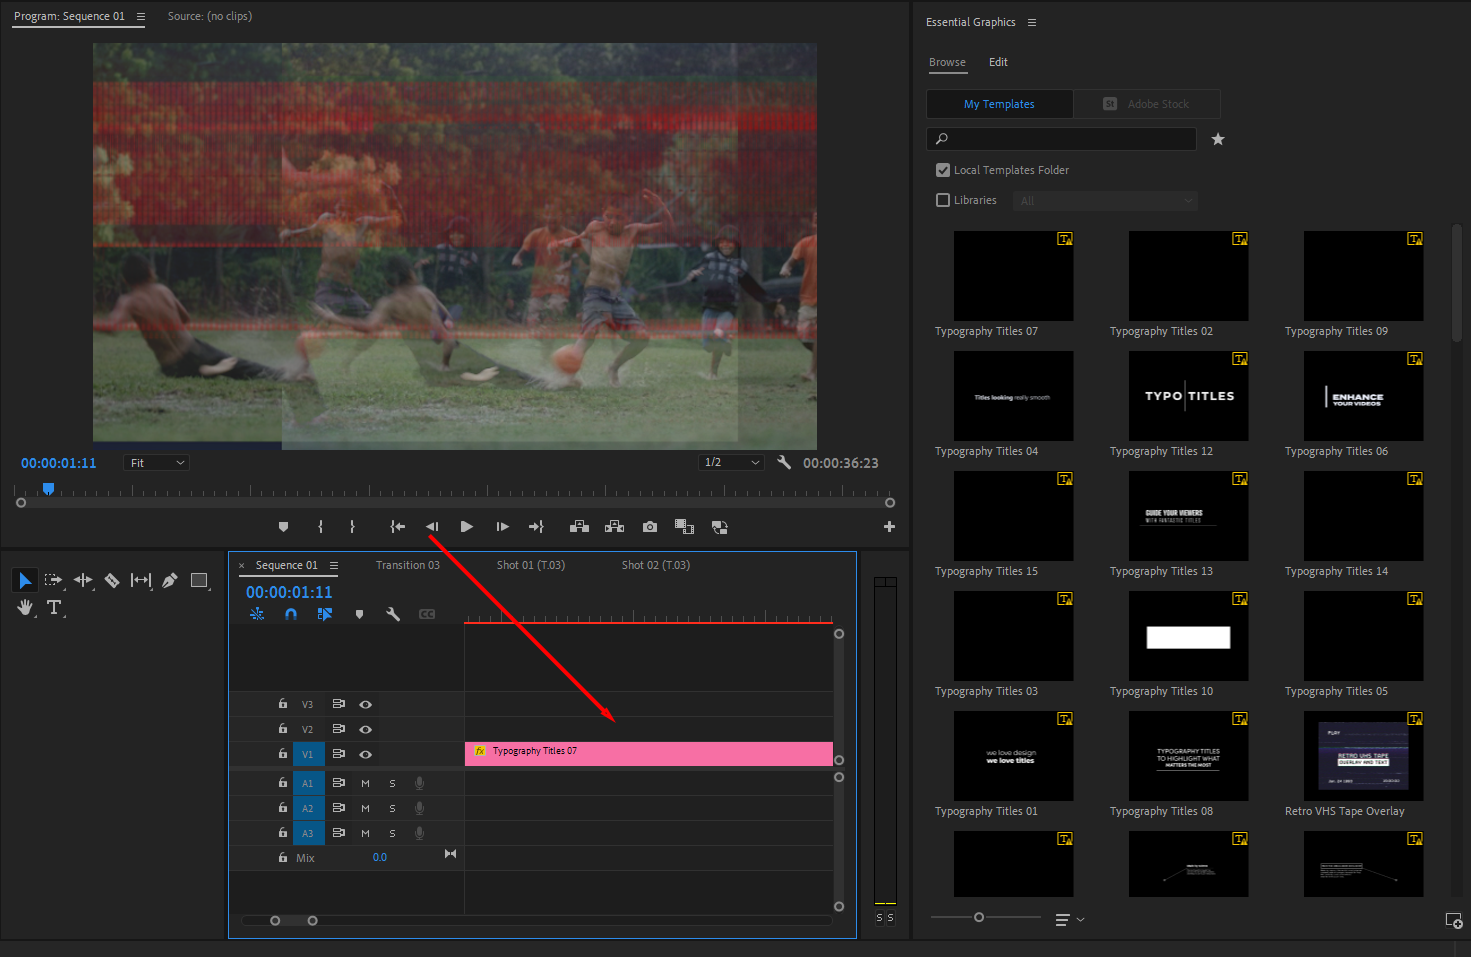
Click on the template in your timeline, and look back at the “Essential Graphics” panel. You’ll see a bunch of sliders and text boxes. This is your control room.
Make It Yours Without Breaking It
The biggest mistake newbies make is opening up the “Source” files or diving into the “Motion” tab and wrecking fifty hours of someone else’s work. Don’t do that.
Stick to the “Edit” tab inside the Essential Graphics panel. Here, you can change the text from “Your Title” to “My Awesome Video.” You can swap colors by clicking on the little color swatch – try pink; it’s a vibe.

You can even speed up or slow down the animation with a slider that says “Duration.” Pro tip: Make it a bit faster than the original so your intro doesn’t feel like it’s wading through molasses.
When Things Go Weird
Sometimes, you’ll type your title, and the text will be too small, or the box won’t fit. That’s fine! Look for a setting that says “Text Size” or “Scale” and just crank that number up. Exaggeration is your friend here.
If the template has a logo placeholder that looks like a scary question mark, just click on the “Choose File” button and upload your own .PNG logo. It’s like giving a mannequin a real face.

Remember, a template is a starting point, not a prison sentence. Slap your unique spin on it, and it instantly stops being “generic template” and becomes “your signature look.”
Export Like a Boss
Once you’re happy and you’ve watched your intro a dozen times because it’s just so slick, hit Ctrl+M (or Cmd+M on a Mac) to export. Pick a preset like “High Quality 1080p” and hit “Export.”
Done. You just made a video with a killer animated intro, and you didn’t even break a sweat. Go ahead, send it to your group chat.
They’ll ask if you hired a professional. You can wink and say, “Let’s just say I have good taste in templates.” Then go make another one, because honestly, this is dangerously fun.