
Installing Ditra Heat Over Concrete
Last winter, I watched my best friend Mike do the “kitchen sock slide” – a graceful, if involuntary, maneuver across his ice-cold concrete slab. He landed with a thud, looked up at me, and declared his tile floor a personal betrayal. That’s when we started talking about Ditra Heat, and let me tell you, it was less about luxury and more about survival.
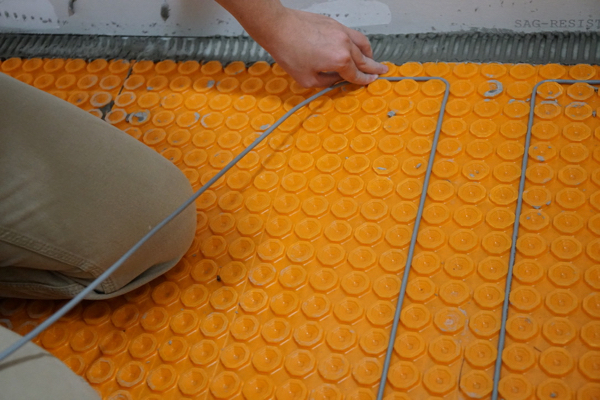
You see, concrete is a brutal heat thief. It sucks the warmth right out of your feet and sends it to the earth below, like a tiny, invisible vampire. If you’re planning to lay tile over it, you’re basically committing to a lifetime of cold mornings unless you do something about it. And that “something” is a deceptively simple orange mat with a bunch of little round tits.
I’m talking about the uncoupling membrane that also happens to be a heating system. But before you get starry-eyed, let’s get one thing straight: this isn’t a weekend job for the faint of heart. It’s a project that rewards patience, a steady hand, and a tolerance for reading fine print on a bag of thinset.
Must Read
The “Why” Behind the Orange Mat
So why bother with Ditra Heat over concrete, you ask? Fair question, especially since your concrete is probably perfectly flat and structurally sound, right? (Cue the ironic laughter from anyone who’s ever looked at a slab with a level.)
The magic of Ditra is that it decouples your tile from the concrete. Concrete expands, contracts, and sometimes cracks from settling, and without a buffer, that crack telegraphs straight up through your gorgeous porcelain. The mat’s waffle-like structure absorbs that movement, so your tile stays put—no stress fractures, no popped grout, just blissful ignorance.

But the real hero is the uncoupling combined with the heating cable. You’re not just protecting your tile; you’re turning your floor into a giant, gentle radiator. And on a cold January morning, stepping onto that warm stone feels like a hug from a very expensive, very flat golden retriever.
Prepping the Slab: The Unsexy Part
Here’s where I have to be brutally honest with you. The concrete needs to be clean, and I mean surgically clean. Not “I swept it yesterday” clean, but “get down on your hands and knees with a scraper and a vacuum” clean. If there’s paint, glue, or old adhesive, that orange mat will not bond, and you’ll have a floating floor that rattles.
Check for cracks, too. If you have a big one, you might need to fill it with a crack-suppression membrane first. (Yes, that’s a thing, and yes, you should do it. Trust me on this one.)

Pro tip from a guy who learned the hard way: Do a moisture test. Tape a plastic sheet to the concrete for 24 hours. If there’s water beading on the underside, your slab is too damp, and the heat will just push that moisture up into your thinset. That’s a recipe for mold and failure—not the good kind of DIY story.
Laying the Mat: The Puzzle Phase
Now the fun begins. You roll out the Ditra Heat membrane and cut it with a utility knife. It’s like a giant, orange yoga mat for your floor. You’ll use a notched trowel to spread unmodified thinset onto the concrete—not modified, because the plastic mat doesn’t like the chemicals in the modified stuff. It’s a picky eater, that mat.
Press the mat into the thinset with a float or a roller. You want good contact, but don’t squash the air pockets completely. Those little squares are your thermal insulation and uncoupling action. They need to breathe.

Now, here’s the ironic twist: the mat has a peel-and-stick fleece on top. You might think, “Oh, this is easy, I just stick the cable to it.” No, my friend, you must press the fleece down firmly over the entire surface so the cable has a solid anchor. It’s tedious, but it’s the difference between a cozy floor and a lumpy one.
The Cable: Patience Is Not a Virtue, It’s a Requirement
Installing the heating cable is like playing with a very expensive, very rigid piece of spaghetti. You’ll lay it in serpentine loops, using the little tabs on the mat to hold it in place. Don’t cross the cable over itself, or you’ll create a hot spot that could burn out. That’s not a “think about it” rule—that’s a do not rule.
Make sure you leave the floor sensor wire (the cold lead) in the right spot, between two loops, so the thermostat knows what’s really happening. And for the love of all that is holy, do a continuity test before you cover the whole thing with thinset. Measure the resistance on the cable and compare it to the label. If it’s off, you have a broken wire, and you’d rather find out now than after your tile is in.

The Final Cover-Up
Once the cable is in, you’ll trowel a layer of modified thinset right over the mat, filling those little squares completely. It’s messy, it’s gritty, and it will test your upper body strength. But when you’re done, you have a perfectly flat, heated substrate ready for tile.
Let it dry for a day, then fire up the thermostat to warm up the slab slowly. It’s like seasoning a cast iron pan—you don’t blast it on high. Curing the thinset with heat too fast can cause cracks.
And there you have it. Mike’s kitchen is now the warmest room in his house, and he hasn’t done the sock slide in months (he’s added slippers now, out of pure habit). Installing Ditra Heat over concrete is not rocket science, but it’s a dance of preparation, precision, and a little bit of faith. Do it right, and you’ll never fear winter mornings again. Do it wrong, and well… at least you’ll have a good story to tell your friends over cold coffee.


